Pasang Iklan Disini
Alt/Text Gambar Alt/text Gambar Alt/Text Gambar Alt/Text Gambar

Rabu, 24 Juli 2013

How To Troubleshooting Laptop With Backlight Failure


This laptop came for repair because of the LCD screen backlight failure. My customer complained that the laptop LCD screen is black but the laptop works with an external monitor.


Here are my steps for troubleshooting this laptop with the backlight failure.

First of all, I tested this laptop with an external monitor connected to the VGA port and the external monitor worked absolutely fine. I was able to get crystal clear image on the external screen even though the internal screen didn’t light up. If the external screen works fine, then most likely there is nothing wrong with the video card.

Notebook display assembly diagram

After that I took a closer look at the laptop LCD and noticed that the screen is not completely black. The laptop screen still works but the image is very very dull, you barely can see it. It means that the screen still gets data signal from the video card, but for some reason the backlight lamp doesn’t work.
From my experience I know that this problem can be related the lid close switch, faulty inverter board or bad backlight lamp. I checked them one by one.

If you have a similar problem, make sure the lid close witch moves freely. The lid switch is a small button located close to the LCD screen. This button triggers the hibernation or sleep mode when the screen is closed. If the lid close switch is dirty, it might get stuck inside the laptop case and cut off the power from the inverter board. The inverter board works as a power supply for the backlight lamp and if there is no power coming to the inverter board, the backlight lamp will not light up either.

Image with pinkish tone


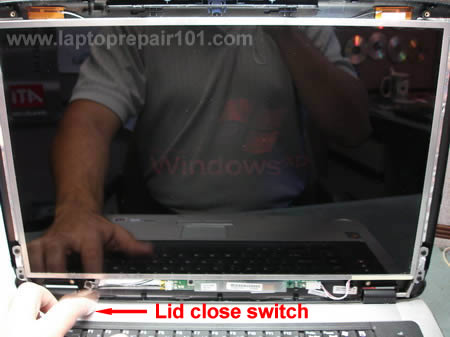
In my case the lid button worked properly, it didn’t stuck inside the case. When I was pressing on the button very fast, I was able to light up the screen but only for a fraction of a second. The image wasn’t bright and it had a pinkish tone. A pinkish tone usually indicates a problem with the backlight lamp, not the inverter board.

Replaced inverter board

Even though I suspected the backlight failure, I decided to test this laptop with a new inverter board just in case. But it didn’t help. The screen didn’t light up even after I replace the inverter board. So, I was right, this problem is not related to the inverter board.

Connected known good backlight lamp

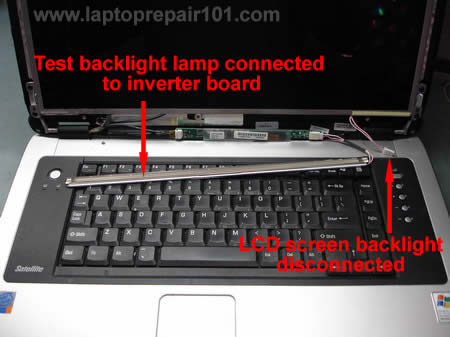
Finally, I disconnected the screen backlight lamp connector from the inverter board and connected my test backlight lamp (I removed it from another cracked screen). For the test purpose, you can buy a new backlight lamp here. Try to find a backlight with the connector already attached to it, so you can plug it into the inverter board. Make sure the connector on the backlight lamp is similar to the connector on your LCD screen.

My backlight lamp works fine

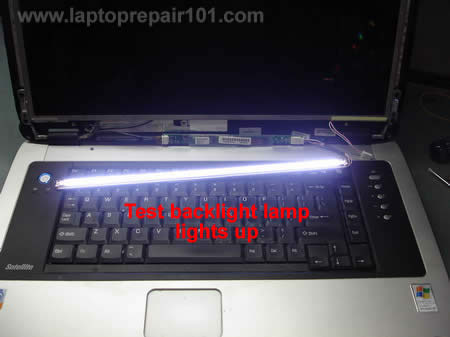
As soon as I turned on the laptop, my backlight lamp lighted up. Yep, that’s the problem. The laptop screen has a faulty backlight lamp.

Here’s another laptop with backlight failure

This laptop video fails in a little bit different way. In this case the backlight lamp hasn’t failed completely.

Background has reddish tone

The laptop starts with video on the screen but the background has reddish tone, the screen flickers and it makes noticeable buzzing noise coming from the backlight and inverter area. After a few minutes the backlight turns off by itself and the buzzing noise stops. When the backlight is off, the image on the screen is still visible but it’s very dark.

Backlight lamp connected

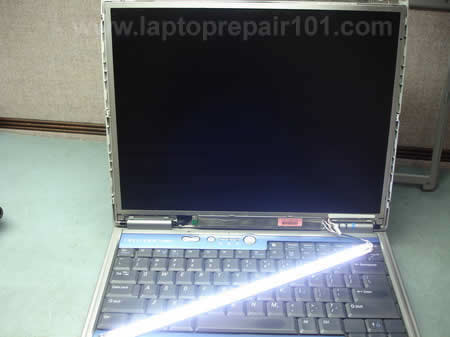
I removed the screen bezel and connected my test backlight lamp.

Backlight works
My test backlight works absolutely fine. The lamp doesn’t flicker and there is no buzzing noise. So, this laptop needs a new backlight lamp.

How to Service Broken Keyboard Connector on Laptop

This guide explains how to fix a broken keyboard connector on a laptop motherboard. I do not claim that my instructions will work for any connector type in any laptop brand, but if I can help a few people, I can call my mission accomplished.


Let’s say the keyboard in your laptop stopped working properly and you decided to install a new keyboard yourself. You disassembled the laptop, removed the keyboard, tried to unlock the keyboard connector and… OHH! MAN!… a piece of the locking clip on the connector got broken!


What can you do? Unfortunately, you don’t have a lot of options. The keyboard connector is permanently soldered to the motherboard and cannot be replaced at home. If the connector was damaged, you’ll have to replace the whole motherboard, use the laptop with an external USB keyboard, or…. try the following trick. Hopefully it works or you.


The keyboard cable is locked inside the connector on the motherboard. In order to remove the keyboard, you have to unlock the connector and release the cable.


On the picture below you see one of the most common connectors. It has the base (white in my case) and locking clip (brown in my case). The keyboard cable is jammed between the locking clip and base.
To unlock the connector, you have to move the locking clip about 2 millimeters in the direction shown by two yellow arrows.

IMPORTANT! The locking clip must stay attached to the connector base.
After that you can pull the keyboard cable (green arrow) and remove the keyboard.


If you are not careful enough, you can move the locking clip too much and break it.
On the picture below you can see the locking clip is missing the left hook.


On the next picture both sides of the clip are broken.


IMPORTANT! Do not though away the broken clip even though it looks completely useless.

If you insert the cable into the connector and will not lock it with a clip, the cable will not make good contact with pins inside the connector and the keyboard will not work.


Here’s how to install the broken clip back in place and make it work.
Position the broken clip the way it was before. In my case both sides of the connector are broken. What could have been worse?


Carefully insert the keyboard cable into the connector. Note, in this type of connector, the cable goes above the locking clip.


Carefully push the broken clip back in place. You can use a small screwdriver to push on the clip behind the cable.

The clip fits tightly when there is a cable inside the connector.


Secure the connection with sticky tape and you should be good to go. The keyboard should work just fine.


The keyboard connector shown on the following picture is very similar to the previous one. The only difference – the keyboard cable is routed under the locking clip. Fix it the same way as the previous connector.


On the next picture you see another type of keyboard connector. The cable is inserted vertically.


In order to unlock the connector, you’ll have to move the locking clip (brown piece) about 2 millimeters up in the direction shown by two yellow arrows. After that you can pull the keyboard cable (green arrow) and remove the keyboard.


If you move the locking clip too far, you can break it.
In my example the right side of the clip is broken. But you still can use it!


Insert the keyboard cable into the connector, position the broken locking clip correctly (behind the cable in my case) and carefully push it in.


Even with a broken clip the cable will make good connection with the base and the keyboard should work.


Here’s the same connector shown from the opposite side. You cannot even tell if the locking clip is broken.


If this trick worked for you, it means I just saved you a few hundred bucks on the motherboard replacement.

Cara Setting IP Camera di Akses Via Internet

Banyak pertanyaan datang ke kami : "Bagaimana caranya membuat IP Camera kita dapat diakses dari internet?". Sebenarnya cukup mudah untuk melakukan ini, di semua D-Link Broadband Router terdapat fitur yang disebut Virtual Server.

Cara kerja fitur ini cukup sederhana yaitu mem-forward port-port tertentu ke sebuah mesin di jaringan internal kita. Lalu apa bedanya Virtual Server dengan Port Forwarding? Cara kerjanya hampir sama, hanya dengan Port Forwarding kita bisa menggunakan banyak port (misalnya dari 8000-8010 atau 80,90,100) sdgkan Virtual Server hanya dapat menggunakan satu buah port (misalnya 8000 saja)

Dalam contoh kali ini, saya akan menggunakan koneksi FirstMedia (Fastnet), DIR-655 sebagai Router dan DCS-6620 sebagai IP Camera-nya.

Layout seperti dibawah ini :


IP WAN DIR-655 didapat secara dynamic dari ISP, sedangkan IP LAN-nya diset default yaitu 192.168.0.1

Untuk DCS-6620, IP-nya diset ke 192.168.0.80 dengan gateway dan DNS ke 192.168.0.1, untuk port HTTP dalam contoh ini saya ganti menjadi port 8000 (anda bisa mengganti dengan port berapa saja (diatas 1024), asalkan tidak konflik dengan yang sudah ada ). Bisa dilihat di gambar berikut :


Setelah selesai maka kita set Virtual Server di DIR-655, masukkan IP si Camera dan set Public Port ke 8000 dan Private Port ke 8000. Apa beda Public Port dan Private Port? Public Port adalah Port yang "terlihat" di internet sedangkan Private Port adalah port si Camera itu sendiri (ingat tadi saya menggantinya ke 8000)


Setelah selesai tinggal "Save Settings" dan bila ada perintah "Reboot Now", reboot DIR-655 anda.

Nah sekarang kita cek berapa IP WAN yang didapat (karena IP dari ISP adalah dynamic) :


Setelah itu kita coba dari koneksi lain, misalnya dari ADSL tetangga atau teman :-D atau minjem 3G sodara :-D, untuk mengakses IP Camera, kita cukup dengan menuliskan alamat di Internet Explorer dgn format : http://A.B.C.D:xxxx dimana A.B.C.D adalah IP WAN yang kita liat dari Status --> Device Info tadi dan xxxx adalah Public Port yang kita define di settingan Virtual Server.

Contohnya :


Sekarang yang jadi pertanyaan, apakah kita harus cek WAN IP di router kita terus menerus kalo kita mau lihat IP Camera kita? Selama WAN IP kita adalah Dynamic IP maka jawabannya "Ya". Lalu ada pertanyaan lainnya, adakah cara untuk mempermudahnya, jawabannya jelas ada, kita dapat menggunakan fitur DDNS dalam hal ini. Bagaimana caranya? Saya akan jelaskan di posting berikutnya :-)

Memahami Baterai Ponsel


Sebuah Baterai ponsel memiliki Standard minimum untuk dapat menghidupkan Ponsel hingga memasuki Menu utama Ponsel.
Standard minimum baterai ponsel adalah 3,6v DC.

Jika Tegangan baterai berada dibawah standard minimum,maka pastinya ponsel tidak dapat dihidupkan. Jika tegangan baterai berkisar 3,4v - 3,5v DC, Maka saat ponsel dihidupkan, hanya akan tampak Berkedip atau hidup sesaat lalu mati dengan sendirinya. Hal seperti ini seringkali membuat pengguna ponsel khawatir dengan keadaan ponselnya. Hingga terkadang mengambil kesimpulan bahwa ponselnya mengalami kerusakan pada Operating Systemnya / Software, Terkena Virus, dll.

Apalagi jika tegangan baterai jauh berada dibawah standard minimum tegangan baterai, Maka jika ponsel dicoba untuk melakukan pengisian baterai, ponsel seperti tidak merespon apapun. Dan Ponsel disangka mati total. Padahal hal seperti ini wajar adanya. Karena jika tegangan baterai jauh berada dibawah Standard minimum, maka untuk dapat menampilkan Display indikator pengisian baterai (gambar Baterai mengisi), Ponsel membutuhkan Delay antara 5 - 10 menit.

Dan perlu diketahui bahwa pada kondisi ponsel dimatikan, Baterai tetap menyalurkan tegangan ke beberapa komponen seperti IC Power, IC Power Amplifier/IC PA, IC User Interface/IC UI, dan IC Control Charger, hingga tegangan baterai benar-benar terkuras habis.

Download & Cara Install Ulang atau Upgrade OS BlackBerry Terbaru

Install ulang atau memperbaharui OS BlackBerry biasa dilakukan pengguna BlackBerry untuk mengatasi berbagai permasalahan yang ada pada BlackBerry. Berbagai permasalahan seperti BlackBerry lemot atau loading lama, BlackBerry hang atau blank, error JVM Error 545 503, atau BlackBerry yang mati total. Salah satu cara mengatasi permasalahan tersebut adalah dengan upgrade OS BlackBerry. OS BB yang bisa anda install ke BlackBerry terbagi menjadi beberapa jenis. Anda bisa menerapkan OS beta dan OS full atau yang sudah resmi di rilis oleh RIM.
Download dan Cara Install Ulang atau Upgrade OS BlackBerry Terbaru
BlackBerry 7 OS (c) blackberry.com
Cara upgrade atau install OS BlackBerry bisa anda lakukan sendiri tanpa harus membawa BlackBerry kesayangan anda ke tempat servis HP atau gerai BlackBerry. Beberapa software keperluan untuk install ulang BlackBerry bisa dengan mudah anda dapatkan dengan download di internet. Tools software untuk install ulang BlackBerry yang harus anda pakai dalam tutorial ini adalah BlackBerry Desktop Manager dan OS resmi dari model atau jenis OS BlackBerry. Berikut panduan lengkap untuk upgrade OS BlackBerry yang bisa langsung anda praktikan.

Tools for Upgrade BlackBerry OS

  1. Ponsel BlackBerry yang akan di upgarde.
  2. Koneksi internet untuk download software.
  3. Komputer PC atau laptop dengan operating system Windows.
  4. Kabel data USB original BlackBerry.
  5. Software BlackBerry Desktop Manager. Bila belum punya download disini. Klik disini.
  6. OS BlackBerry. Pilih OS terbaru  sesuai jenis BlackBerry anda. Klik disini.

Cara Upgrade BlackBerry

  1. Install Desktop Manager (DM) di perangkat komputer PC atau laptop.
  2. Insall OS yang akan digunakan untuk UpGrade (biasanya sistem akan melakukan auto detect untuk versi OS anda). Jika download file OS tidak sesuai carrier, maka dari windows explorer lakukan search (including system and hidden files) file dengan nama ‘vendor.xml’ setelah ketemu hapus aja file tersebut (kalo pake WindowsVista, bisa dicari di : C:\Program Files\Common Files\Research In Motion\AppLoader). Kalo filenya sesuai carrier, biarkan saja
  3. Installation Wizard akan muncul,
    —– klik ‘Next’
    —– pilih negara anda, ‘Accept the terms of service’
    —– klik ‘Next’ lagi.
  4. Setelah proses instal selesai di PC, anda akan diminta untuk memulai Blackberry Desktop Manager. Centang pilihan ini lalu klik ‘Finish’. Secara otomatis Desktop Manager akan terbuka, silahkan hubungkan ponsel BlackBerry anda ke PC atau laptop melalui kabel data USB. Seandainya setelah beberapa menit BlackBerry Dekstop Manager tidak terbuka, berarti anda harus menjalankannya secara manual.
  5. Hubungkan BlackBerry ke komputer atau laptop via kabel data USB.
  6. Buka BlackBerry Dekstop Manager. Kalau ada permintaan upgrade OS BlackBerry di cancel dulu.
  7. Lakukan Backup data dulu supaya kalau ada masalah data bisa dikembalikan. Caranya, Run the BlackBerry Dekstop Manager –> Select Backup/Restore –> Backup –> Select dimana anda akan menyimpan file backup anda.
  8. Setelah Selesai backup data, masuk ke application loader.
    Kalau ada permintaan masukkan password BlackBerry, masukkan paswordnya (kalau tidak ada paswordnya, klik ok).
  9. Pilih add/remove application.
    Kalau normal akan muncul semua file program yang akan diinstall. Silahkan dipilih language dan program/aplikasi bawaan OS apa saja yg mau diinstall di Blackberry. Ikuti instruksi di Desktop Manager (DM) tersebut, dan tunggu sampe selesai prosesnya.
  10. Selesai Upgrade OS Blackberry, cabut kabel data, restart lagi BlackBerry anda, tutup BlackBerry Dekstop Manager.
  11. Uninstall file OS dari PC/laptop (optional).
Bila yang masih awam, lakukan dengan hati-hati langkah upgrade OS BlackBerry diatas. Bila menemukan fatal error atau gagal, silahkan wipe Blackberry dan re-install lagi OS nya. Dalam tutorial ini, kami tidak bisa menjamin dan bertanggung jawab atas berhasil atau tidaknya proses install OS BlackBerry. Semua tergantung pada cara dan kondisi pada masing-masing BlackBerry.

Inilah Kode Rahasia Blackberry Perlu Anda Ketahui

Inilah Kode Rahasia Blackberry Perlu Anda Ketahui – Setiap pabrikan ponsel biasanya menambahkan kode-kode yang tersembunyi dalam gadget buatannya tidak terkecuali dengan Blackberry, setiap kode di dalam masing-masing merek ponsel tidaklah sama dan tentu fungsinya juga berbeda pula. Biasanya kode rahasia atau tersembunyi diberikan untuk memudahkan pengguna mengakses aplikasi tertentu atau dengan kata lain sebagai short cut.
kode Rahasia Blackberry
Dibawah ini merupakan kode rahasia blackberry yang Teknoflas kutip dari berbagai sumber, Selasa (20/5/2013). Kode Blackberry ini dapat digunakan untuk semua tipe hadset Blackberry seperti gemini, bold, storm, onyx, curve, os6, os7,dan semua type bb.
  • ALT + N M L L untuk mengetahui kapasitas sinyal bar
  • ALT + V A L D untuk verifikasi Address Book
  • ALT + R B L D untuk merombak Address Book
  • ALT + R B V untuk melihat source code dalam Webpage
  • ALT + left Shift + press H untuk mengetahui info teknis yang ada dalam Blackberry
  • * # 0 6 # untuk mengetahui IMEI yang ada pada Blackberry
  • ALT + L G L G untuk mengetahui log yang sudah dilakukan dalam Blackberry
  • ALT + NUM / Aa / Cap + H untuk mengetahui Akses Informasi PIN – IMEI – Vendor ID – Free Memory – Versi OS
  • M E P D pada Sim Card untuk mengecek status Blackberry locked atau unlocked
  • ALT + Cap / Aa Right + DEL untuk merestart Blackberry yang sedang nge-hang

  • ALT-N-M-L-L
  • Fungsi : Menunjukkan kuat sinyal dalam dBm (bukan ‘batang’).
  • ALT-V-A-L-D> di’addressbook’
  • • Fungsi : Periksa inkonsistensi data di address book.
  • ALT-R-B-L-D > di’addressbook’
  • Fungsi : Menyusun ulang struktur data di address book.
  • ALT-Shift-kanan-Del
  • Fungsi : soft reset HH-nya, mirip dengan ‘cabut batere’.
  • ALT-Shift-kiri-H
  • Fungsi : Menunjukkan info teknis penting tentang HH.
  • ALT-R-B-V-S> di’browser’
  • Fngsi : Menunjukkan source-code dari hal.web
  • ALT-L-G-L-G
  • Fungsi : catatan/log dari event2 di system HH
  • *-#-0-6 > di’homescreen’
  • Fungsi : Menunjukkan kode IMEI handset.

  • Enterprise Activation
  • ALT-CNFG In Options -> Advanced Options -> Enterprise Activation Settings for Enterprise Activation
  • Kode Rahasia Blackberry Address Book
  • ALT-VALD In address book list Validate the data structure and look for inconsistencies
  • ALT-RBLD In address book list Force a data structure rebuild
  • Kode Rahasia Blackberry Browser
  • ALT-RBVS Any HTML/WML webpage View web page source code
  • Kode Rahasia Blackberry Calendar
  • ALT+VIEW Inside any Calendar item Show extra info for a Calendar event
  • SYNC Calendar app>Options Enable Calendar slow sync
  • Cophyright © Hackcenter™
  • RSET Calendar app>Options Will prompt for a reload of the calendar from the BES
  • RCFG Calendar app>Options Request BES configuration
  • SCFG Calendar app>Options Send device configuration
  • DCFG Calendar app>Options Get CICAL configuration
  • SUPD Calendar app>Options Enable detailed Cal. report for backup
  • SUPS Calendar app>Options Disable detailed Cal. report for backup
  • SUPN Calendar app>Options Disable Cal. report database
  • LUID Calendar app>Options Enable view by UID
  • SRSL Calendar app>Options Show Reminder status log
  • Kode Rahasia BlackberryMessaging
  • ALT + V I E W For messages, displays the RefId and FolderId for that particular message. For PIM items, displays only the RefId.
  • Kode Rahasia Blackberry Search Application
  • ALT-ADVM Search Application Enabled Advanced Global Search
  • Kode Rahasia Blackberry MMS
  • MMSC Options -> MMS Show MMS hidden options
  • Kode Rahasia Blackberry Home Screen
  • ALT-JKVV Home Screen Display cause of PDP reject
  • ALT + CAP + H Home screen Displays the Help Me screen
  • ALT + E A C E Home screen Displays the Help Me screen
  • Cophyright © Hackcenter™
  • ALT + E S C R Home Screen Displays the Help Me screen
  • ALT + N M L L Home screen Switches the signal strength from bars to a numeric value.
  • ALT + L G L G Home screen Displays the Java™ event log.
  • Kode Rahasia Blackberry WLAN
  • ALT-SMON WLAN wizard screen Enable simulated Wizard mode
  • ALT-SMOF WLAN wizard screen Disable simulated Wizard mode
  • Kode Rahasia Blackberry Theme
  • ALT-THMN Any menu Change to no theme (B&W)
  • ALT-THMD Any menu Change to default theme
  • Kode Rahasia Blackberry Date/Time
  • LOLO Options -> Date/Time Show Network time values
  • Kode Rahasia Blackberry SIM CARD
  • MEPD Options>Advanced options>SIM card Display MEP info
  • MEP1 Options>Advanced options>SIM card Disable SIM personalization
  • MEP2 Options>Advanced options>SIM card Disable Network personalization
  • MEP3 Options>Advanced options>SIM card Disable Network subset personalization
  • MEP4 Options>Advanced options>SIM card Disable Service provider personalization
  • MEP5 Options>Advanced options>SIM card Disable Corporate personalization

Selasa, 23 Juli 2013

Tampilan Themes OS 6 Dan 7 Untuk Blackberry Os 5


TEMABLACKBERRY.NET - Tampilan Themes OS 6 Dan 7 Untuk Blackberry Os 5. Kabar gembira untuk anda yang masih menggunakan blackberry OS 5. Situs penyedia tema blackberry terbaik akan menyajikan kumpulan tema blackberry OS 5 yang berisi tampilan menu dan icon OS 6 dan OS 7. Tema blackberry Os 5 berisi tampilan Os6 dan OS7 ini bisa anda download dan install di semua tipe blackberry OS 5 anda entah itu di blackberry curve 8520 gemini, blackberry bold 9700 Onyx 1, blackberry Storm 9550, serta blackberry Javelin.
Tampilan Themes OS 6 Dan 7 Untuk Blackberry Os 5
Terkait dengan informasi tampilan themes OS 6 dan 7 untuk blackberry Os 5 ini, Blackberry merupakan smartphone canggih yang memiliki ribuan aplikasi dan themes blackberrydidalamnya. Mulai dari tema blackberry lucu, tema blackberry unik, sampai dengan tema blackberry romantis untuk cewek dan tema blackberry keren gokil yang bisa anda download secara gratis dan ada beberapa yang versi berbayar.

Namun pada ulasan kali ini kami akan menyajikan secara khusus mengenai Tampilan Themes OS 6 Dan 7 Untuk Blackberry Os 5. Sengaja kami menyediakan tema blackberry terbaru tampilan os 6 dan os 7 ini karena beberapa hari lalu terdapat email masuk yang merequest Os 7 themes for blackberry Os 5 ini di blog download tema blackberry paling update temablackberry.net. Nah untuk anda yang kebetulan sudah tidak sabar ingin mendownload dan menginstall tema bb terbaru tampilan os 6 dan os 7 untuk bb OS 5 ini, silahkan anda download melalui link yang kami sediakan dibawah ini.


Download OFFLINE dan OTA Download
theme_os7_9800 || OTA download
theme_os7_9100 || OTA download
theme_os7_9000 || OTA download
theme_os7_9300 os 6 || OTA download
theme_os7_97xx_96xx_89xx || OTA download
Theme OS7_97xx_9650 || OTA download
Theme OS7_8520_9300_OS5 || OTA download
Theme OS7_95xx || OTA download

Tunggu apalagi, install dan miliki tampilan baru Tampilan Themes OS 6 Dan 7 Untuk Blackberry Os 5 ini di blackberry kamu. Dan sebelum beranjak dari artikel kami yang berisi kumpulan tema OS 5 blackberry ini, jangan lupa untuk mendownload tema blackberry lucu lainnya dari kami, seperti pada tema blackberry Os 7 dan juga Tema blackberry kartun lucu Sekian dan salam sukses dari blog penyedia tema BB unik tebaru Temablackberry.net.
Source :
Tema os 6,tema os 6 untuk os 5,tema os6,tema blackberry 9300 os 7,download tema os6,theme os 6,dounloud tema bb9300 for bb8520,tema BB os6,tema blackberry os6,thema os 6